Membership and Icons
One of the robust features in FSM is the ability to create memberships. There are multiple ways and uses for memberships. Students can have multiple memberships at any one time. Membership icons appear next to a student name on class rosters and searches.

There are system wide icons that you cannot change. This document will show you how to set-up and use the icons you can change, which are membership icons.
Creating a Membership Icons
Start by creating the type of memberships and their corresponding icons under “global settings” ⇾ “categories” ⇾ “membership categories”.
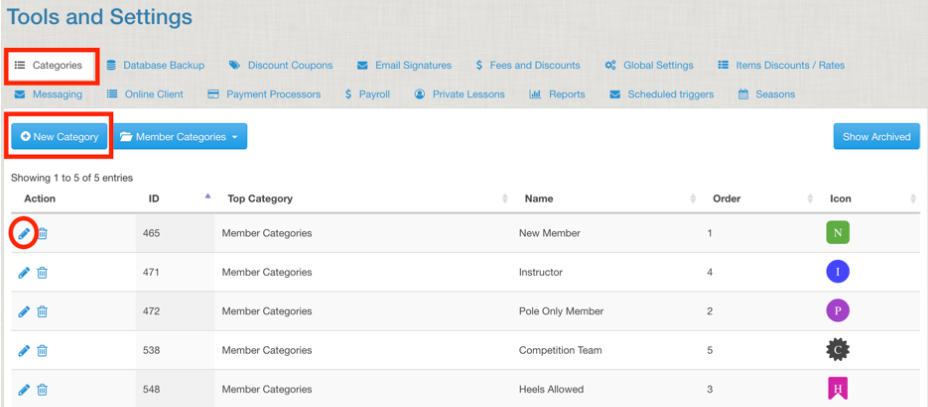
Add a new membership by selecting “new category” or edit an existing membership by clicking on the pencil icon next to it.
A pop-up will open.
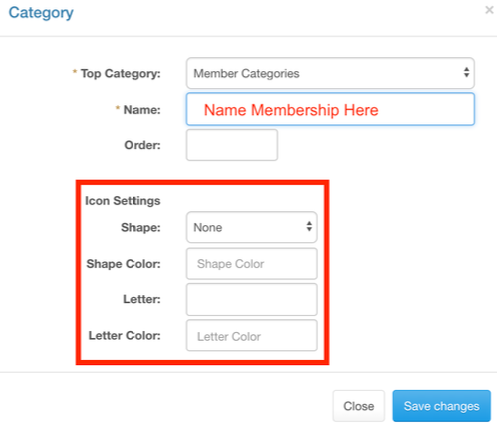
Make sure “Top Category” is “Member Categories”
Name your membership.
Select the order you want this to appear in menus for quick access to this membership.
Fill out the ICON settings to create the icon that will appear next to a student name if they have this membership.
- Select a shape
- Select the color of the shape. After changing the hue you must CLICK it on the left side.
- Add a letter inside the shape
- Set the color of the letter.
Assigning a Membership
Memberships can be automatically assigned through actions (like purchasing a sales item) or creating a new account on the online client. You can also manually assign an icon so think of all your studio needs to group students and then assign a membership to make it easy to access each group.
Membership via Sales Items
The main use of memberships is to assign them to a sales items. This gives you a smart list for everyone with a specific sales item.
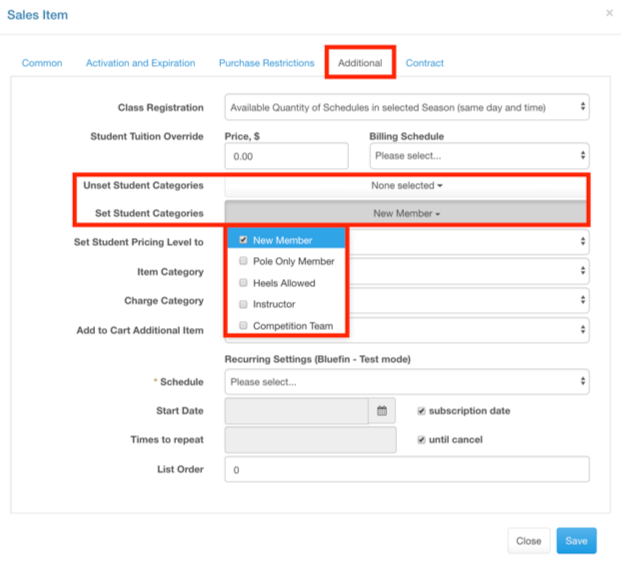
Under the “additional” tab when creating a sales item you have the option to “UNSET” or “SET” a student membership category.
Click on the drop-down menu and select all memberships that apply by check the boxes.
UNSET – removes a membership from that student. For example, you set-up the icon for an Intro class and when they then buy a Package they no longer need to be tracked as “new”.
SET – adds the icon for that membership for as long as the expiry period of that sales item is live. If the sales item is a monthly auto renew, the membership icon will auto renew each month with the sales item. If a payment is missed, the icon will be gone which is another indication something is off with that student account.
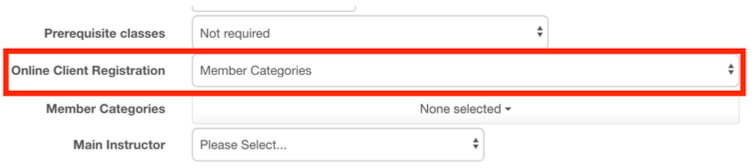
Assign Membership Category via Online Client Registration
If a student creates an account via the online client, the software can automatically assign them a membership icon. (“Global Settings” ⇾ “Online Client” ⇾ “Common”)

The benefit of this is it gives you an easy way to track new students for a longer length of time than just the “never attended” icon. You can “unset” this icon if a student makes a purchase.
If you are using the “private URL” registeration for classes, usually used for Party attendees, you can set up a membership just for those registeration. (“Global Settings” ⇾ “Common”)
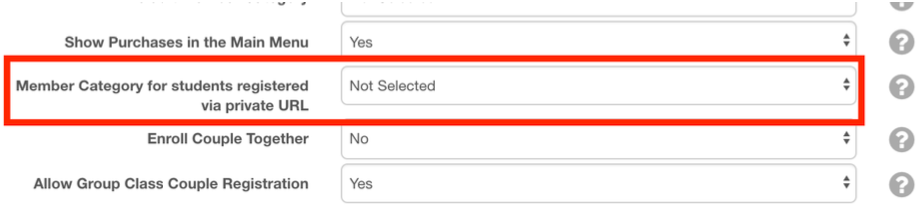
The benefit of this is it gives you an easy way to track students that came to your studio with a friend or group but are not clients. You can “unset” this icon if a student makes a purchase in the future.
Adding a Membership manually in the Student Profile
You can also set-up a membership manually through the student profile. This wouldn’t be attached to any other action but would give them student access to everything the membership allows. (“Student Profile” ⇾ “Main Account” ⇾ “Additional”)

Click the drop down and select the membership category you wish to add to the student by checking the box.
The Activation date will set for today, but edit this if you want it to go live in the future.
Set the Expiration Date for when you want the membership to expire.
Note: when manually creating a membership you will also need to manually remove it if you do not set an expiration date when creating it. We recommend setting an expiration date.
Many studios use the manually membership to create an “instructor” membership level that isn’t tied to a sales item or any sub group (competition team, performance team, etc) that they want to have in a list for easy emailing and gain access to discounts.
Gaining Feature Access Via Memberships
Memberships are used to do a lot of things within the software.
Emailing a Group by Memberships
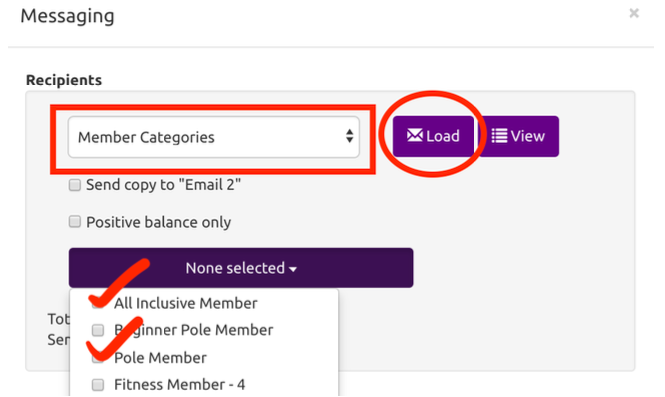
One of the very useful features of Membership is you can send a group email to everyone in your list. In “Messaging” when you are ready to send your email, in the top drop down select “Member Categories” then from the drop box check all those categories you wish to have the email sent to. Then select “load” and all emails will be cued for the email to be sent.
Auto Emails for Attendance by Membership
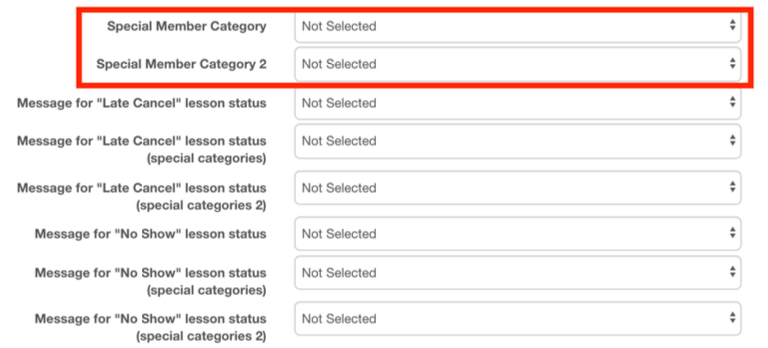
Customize which auto email a member gets if they “late” cancel’ or “no show” for a class. The system currently has two “special category” options for email notifications you can set. First create the email in “Messaging” then set up with memberships get sent which email in “Global Settings” ⇾ “Messaging” ⇾ “Client Notifications”
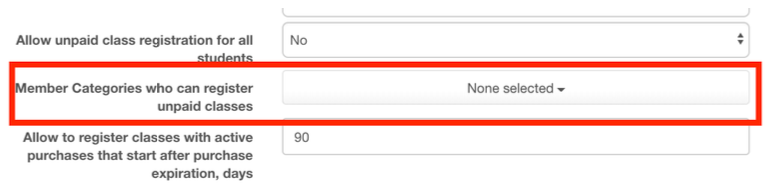
Allowing Membership Unpaid Registration
If you have memberships that auto renew every month, you will likely want them to be able to register for classes outside of their current purchase period (since they have another month that will be starting.) You can give “unpaid” registeration to only specific members via the “Global Settings” ⇾ “Class Registration”
Allowing Membership Special Access to Class Registration
When creating a class, you can choose to only allow specific memberships to be able to see it and register for it. In the “class details” change the “Online Class Registration” drop down to “Member Category” then a new drop down will appear where you can select which memberships to allow to see this class type.
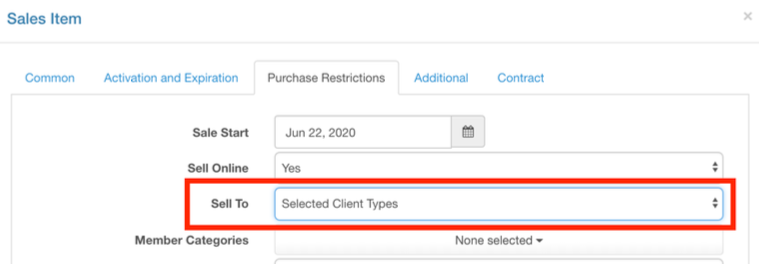
Restrict a Sales Item to Only Be Purchased by a Membership Category
When creating a sales item, you can make it only available for purchase it someone has an existing membership category. Under “Purchase Restrictions” change the “Sell To” drop down to “Selected Client Types” and a new drop own will appear where you can select which memberships to allow to purchase this sales item.
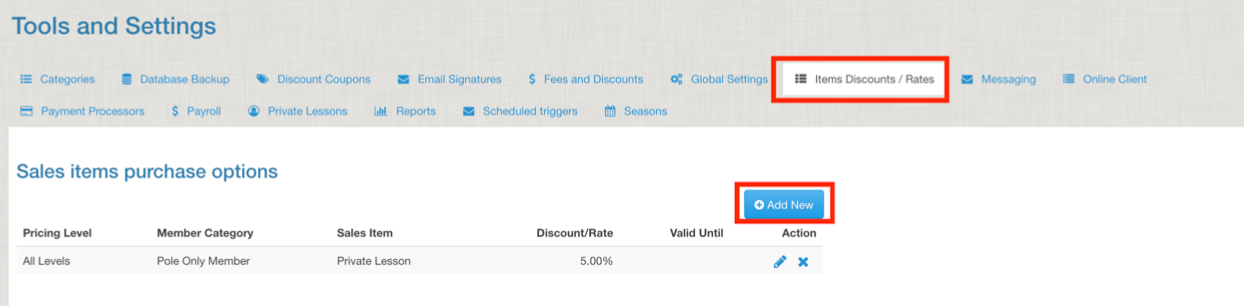
Membership Discounts for Sales Items
Setting up “Item Discounts / Rates” allows specific memberships to have a set discount. Student can have multiple memberships with multiple discounts concurrently and the computer will select the best one at the shopping cart.
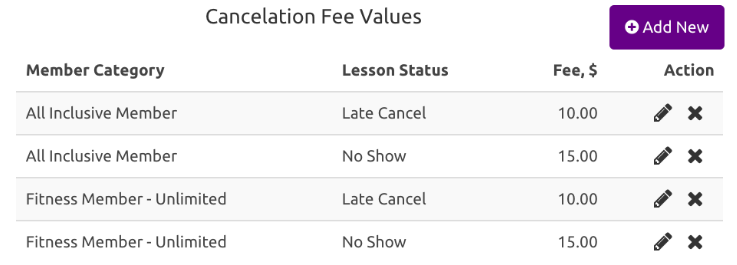
Membership Attendance Status Fees (Late Cancel, No-Show)
If you charge memberships for “Late Cancel” or “No Show” you can set the system to do it automatically and you can have specific fees for each type of cancellation and membership type. To set this up go to “Global Settings” ⇾ “Fees & Discounts”
Then “create new” and set up each of the fees that fit your memberships for attendance failures.
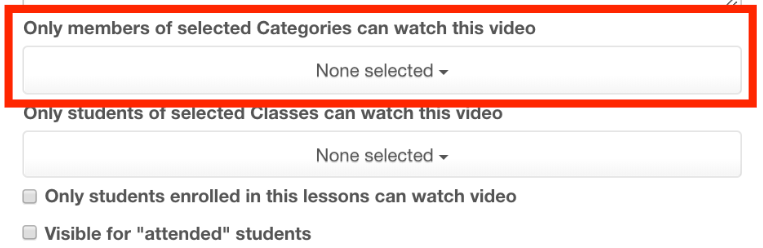
Membership Access to Videos On Demand
The on-demand video library uses Membership categories to gain access. If a student does not have a current membership, they lose access to the videos. For each video the first option to select for access is the Membership; if you leave this blank a student will be able to access the video even if their membership isn’t current. If you select a membership, they will lose access to the video if their membership expires.
Reports with Memberships
Memberships are used in a lot of the report options as a filter. Most client reports have this as a filter but here are a few of our favorites.
Membership Report
This report gives you an overview of how many of each membership type you have. It also will show how many memberships are on hold, which are active and which are upcoming (scheduled to start). You can see all your categories or only select one category to view.
This report also gives you the phone number and email list when exported as a PDF and a fill mailing address when exported as an excel.
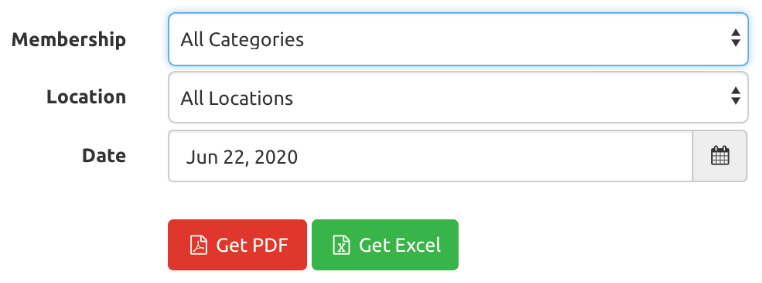
IMPORTANT: the date will always be the date of today, this report does not work retroactively or in the future.
Clients At Risk Report
Keep track of your clients that may have stopped attending with this report. You can search all clients or by specific membership category. The benefit is different memberships may be considered at risk for different length of durations away from classes.

Cancellations Report
Monitor how many cancellations a student has with this report. One of the great features is it gives you “early cancels” as well as “late” and “no show”.

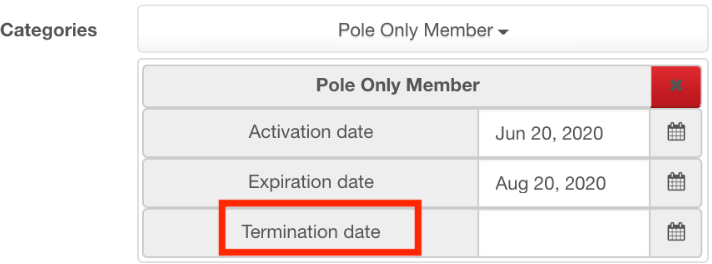
Terminating Memberships
The beauty of memberships is most will expire on their own when a sales item expires or if an “unset” action occurs. If you need to terminate a membership manually, go to the “Student Profile Details” ⇾ “Additional”. Then set the termination date. This will terminate all future autopays with this membership and the student will not be able to resume this type of membership unless you go back in and remove the termination.