Scheduled Triggers Set-up
The software has an extremely powerful auto email system that will send a message based on an action happening. This is called Scheduled Triggers. It can be found under the Settings Menu.
Before creating any scheduled trigger you must first create the message you plan to attach/send. Go to Messaging in the left hand menu and create your message first and SAVE AS A TEMPLATE so it is accessible to be used in the scheduled trigger creation.
Creating A Scheduled Trigger
Settings ⇾ Scheduled Trigger
Click “add new” in the upper right to create a new scheduled trigger. A box will open to complete to create the trigger.
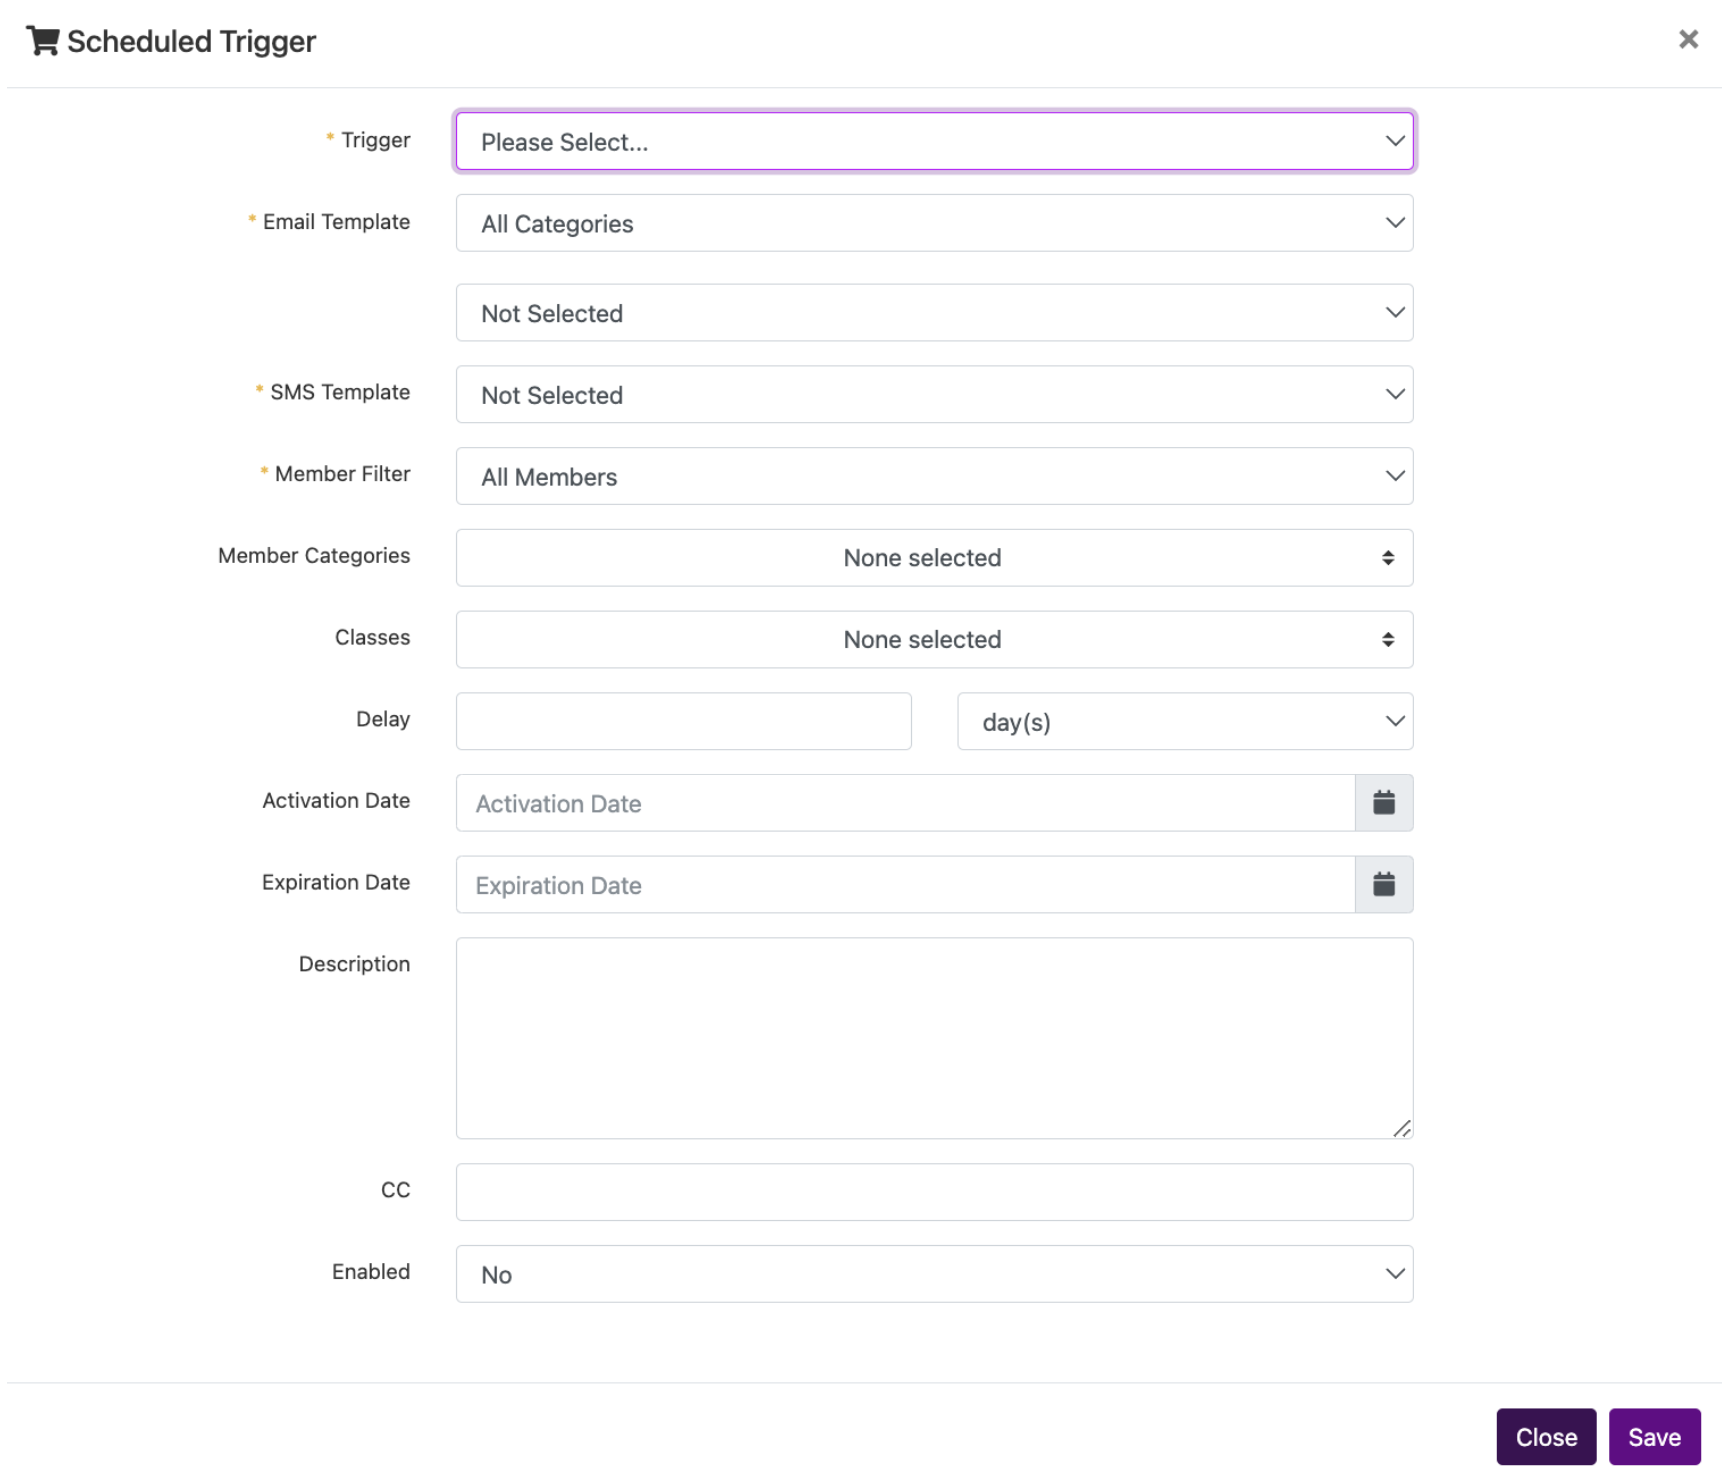
Trigger Components
Trigger: from the drop down select they type of trigger you want to create.
Email template – All categories: if you categories your messages to find then faster, select the filter category here.
Email Template – Not Selected: select the email you want to attach here
SMS Template: select the sms template you want to attach here.
IMPORTANT NOTE: you only select one email OR one SMS per trigger, not both. So select one of these two options when creating your trigger.
Member Filter: select WHO this is going to in general (usually leave this as All Members then use the filters below to narrow it down to specific groups.)
Member Categories: select which member categories should receive this message.
Classes: select which class types should receive this message.
IMPORTANT NOTE: you can set BOTH of these filters to narrow down who is getting the message. Different Member Categories can get different emails for the same class 🙂
Delay in days, hours or minutes: when the message will be sent out. If it is a before trigger, it will be sent that far in advance. If it is an after trigger, it will be sent that far after.
Activation Date & Expiration Date: the start and end date you want this message to be sent.
IMPORTANT NOTE: This is often left BLANK and is primarily only used for the specific “attended notifications trigger” option.
Description: this is only visible to the admin side and helps you remember what it is.
CC: enter an email you want it cc’d to. TIP: set this up initially, then once you are confident the trigger is sending as you desired you can remove this cc and forget about it.
Enabled: One this drop down is set to YES the trigger will be live and start sending.
Editing and Deleting Triggers
Once a trigger is created it will appear in the Scheduled Triggers List.

There is a lot of information at quick glance from the tigger list.
To EDIT an existing trigger settings, click the Pencil Icon on the far left of the trigger. This opens the dialog box to make any changes.
To DELETE a trigger, click the X. This is one of the ONLY places in the software where you are DELETING, not archiving. If you click the X and then want it back you will have to recreate it.
To EDIT the message being sent out by a trigger, of to “Messaging” and edit the message. The Trigger function attaches an existing message so make sure your message is what you want in the Messaging tab from the left hand menu.
Types of Triggers
There are multiple types of triggers. The trigger is the ACTION that happens that will trigger sending the message. The following options are available:
ACH Payment Decline
If your company is set up to use ACH, you can set up a separate trigger to send if an ACH scheduled payment is declined versus if a credit card is declined. This is important if you have different policies for fees for ACH decline.
After First Visit Class
This message will send after the student attends a first class. This message will ONLY send after the first class marked as attended, NOT after every class.
Tip: Make sure to set the “classes” filter for this trigger to work properly!
Attended Notifications
This message will send after a class is marked as attended. It will send every time that a student is marked as attended for a given class.
Tip: Make sure to set the “classes” filter for this trigger to work properly!
Pro-Tip: Get the best use out of this trigger by also setting the activation and expiration dates. This allows you pre-set up triggers for a multi-week course. For example, after week 1 send email X, after week 2 send email Y, etc.
Before Birthday
This message will send before the birthdate date on their profile.
Before Class Start
This message will send before EVERY class they are registered for. If they are registered for a class more than once, they will get this message multiple times.
Tip: Make sure to set the “classes” filter for this trigger to work properly!
Use Tip: this is a good trigger to use if you are doing an online class and want to send direction on how to access the class.
Before First Class Start
This message will send only once, before the first time they are registered for a class. Tip: Make sure to set the “classes” filter for this trigger to work properly!
Use Tip: this is a good trigger to use to send what to wear for a class.
Before Room Booking
If you have set up the room booking feature, this trigger can be set up to send before their room booking time is scheduled.
Card Expiration Reminder
After initial set-up, this trigger will send on the first of the month notifying everyone who has a credit card expiring during that month that their card is expiring. At initial set up, the trigger will send. (example: you created it on the 10th of the month so it will send that day for remainder of month, then will send 1st of month going forward.)
Credit Card Decline
This trigger will send if a scheduled payment is declined. Notify people that their card declined and what actions will be taken.
Tip: use the “last four card” literal in your message in conjunction with this trigger.
IMPORTANT: If you do not set up the ACH Decline trigger, this trigger will send for BOTH kinds of decline.
Waitlist Notification
If a student is moved from the waitlist to the class roster this trigger will send.
IMPORTANT: set a minimum delay for this trigger! 1 minute is good.