Video On-Demand Library
Fit Studio Manager has the ability to show an on demand library both on the Online Client and the app. An important note is that your videos are NOT stored on FSM but on “unlisted” YouTube links so keep that in mind from a security perspective.
Basic Settings
Group Permissions ⇾ Classroom ⇾ Video ⇾ Videos (menu item) checked for any staff you want to be able to SEE the videos tab
Group Permissions ⇾ Classroom ⇾ Video ⇾ check “list” “edit” “archive” “restore” for any staff you want to be able to do these functions
Global Settings ⇾ Online Client ⇾ Common ⇾ Show “Videos” Section ⇾ Yes
Global Settings ⇾ Online Client ⇾ Common ⇾ “Videos” Section Title ⇾ name you want to
have appear for the students for your on demand videos
Global Settings ⇾ Categories ⇾ Video Categories ⇾ add any categories you want to be able to put videos into for easy finding
Add Video to YouTube & Copy URL
Upload your video to YouTube. Set privacy to “unlisted” so your video cannot be found in a search.
Copy the embed link code. Share ⇾ Embed. IMPORTANT. Only copy the http from the entire embed option! This is after the src= and end at title. Do not copy the apostrophe,
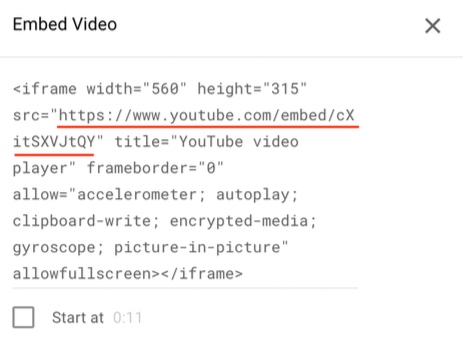
just the https://stuff
Adding Video in Library
Videos tab ⇾ Add new in upper right
Title = name of your video
Link URL = paste the url from YouTube
Category = how to easily find the video
Live box = ignore. This is a place holder for future upgrade options.
Date range when video is visible = set a specific date range or leave blank if always show based on other parameters being met
Description = add video description
Limiting who can see the video
“Only Members of selected Categories can watch this video.”
If this box is checked, only those with a current icon/member category will be able to see this video. If their membership icon expires, they will no longer see the video. Select as many boxes as you want memberships to see the video.
“Only Students of select Classes can watch this video.”
If this box is checked you can further narrow how can see the video as follows. First, select specific class types that can see the video by checking boxes.
“Only students enrolled in this lesson can watch video” allows you to select specific class dates for a student to see the video. ANYONE enrolled, regardless of attendance status will be able to view the view.
“Visible for “attended” students only” will only allow students who have an enrollment status of “attended” from the above date to view the video.
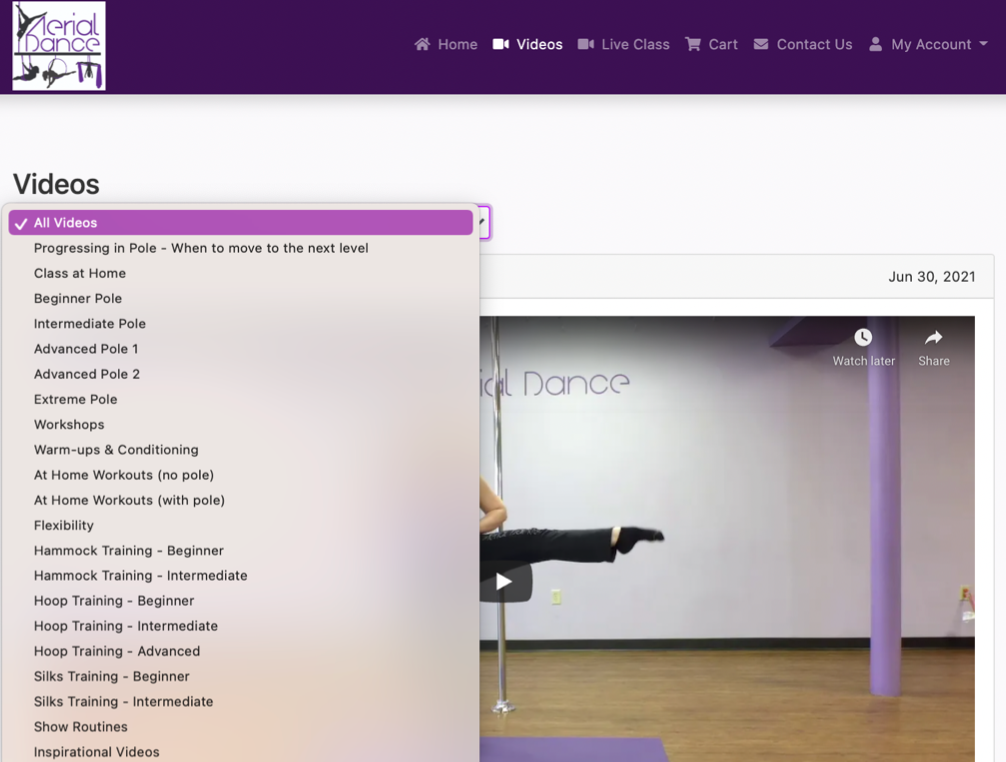
What Students See
When a student is logged into their account, they will see the tab you named above your videos section on both the online client and on the app. When clicking on it they will see all the videos they have access to. On the upper left of the page there is a drop down menu filtering by categories.
How to use it
An example on how to use the video limiting options.
If you have a specific workshop you want to send the video of the choreography to students after. You’d upload. Select the membership type if you want them to loose access if they don’t have a membership. Select the workshop class type. Then select the workshop date. Then decide if you want those that paid for the workshop but didn’t show up to see the video or select “visible for attended” if you only want those who learned the choreo in the workshop to have the video.